Snowblower Forum banner

Upgrading your snowblower lights to LED lights (Please see 1st post edit/mouseover this link)

2 reading
1.1M views 1.6K replies 274 participants last post by  FarmerBob  
#1 ·
[Edit: LED technology has improved exponentially since this thread was started. Be aware that earlier posts may be somewhat outdated, and that you will likely find the most useful information in later updates. Y.R.]

In this thread, we'll talk about the do's and don'ts of LED headlight upgrades for your snowblower, and post videos and pictures of our successes.
There are many models of snowblowers that have a headlight circuit, In most cases, you can find a single wire that registers at anywhere from 12v to 20v AC (with no load) that is located somewhere on the engine, many times under the gas tank. Halogen lights are the typical light that comes with many of our snowblowers. Many of us want much more light than what the halogen bulb can give us, as well as better reliability than a halogen bulb. The search for something brighter and more reliable ends with the LED light. LED's (Light Emitting Diodes) are extremely efficient, very bright, and have thousands of hours of reliable use.
Since the lighting circuit is typically AC current at somewhere between 40-60hertz, if you just attach an LED light to the circuit you'll get pulsing light (think on and off 40-60 times a second) This is caused by the nature of an LED, because an LED is polarity sensitive, and has no warm-up or cool down time when compared to a halogen bulb filament, the LED will flicker noticeably. The flickering of an LED on AC current is mildly annoying to many people, but VERY annoying when you are attaching it to a moving object like a snowblower. An LED that is in motion when attached to AC current (for reasons I won't even begin to get into) flickers much more noticeably. To test this for yourself, take a strand of LED Christmas lights, plug them in, and then swing them in front of you at arm's length, you'll see a strobing or flickering effect.
You can see many LED headlight upgrade videos on youtube like this one, where you can definitely see the flickering or strobing of the LED's. You can see the effect the flicker has on the video camera, you get weird tracks that go from top to bottom of the video frame.
1. EXAMPLE OF IMPROPER LED LIGHT INSTALL- NOTICE THE FLICKERING
2. EXAMPLE OF YET AGAIN AN IMPROPER LED LIGHT INSTALL- NOTICE THE FLICKERING
This is what it looks like once you add a bridge rectifier, even though you’ll see a tiny bit of flicker in the video, in person there is none, you also can notice that there is no “tracking” effect like in the other videos.

The problem of light flicker is solved by using a full wave bridge rectifier.
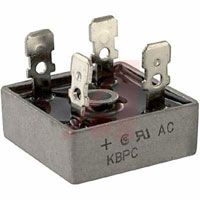
A bridge rectifier takes AC current and changes it into DC current using 4 diodes.
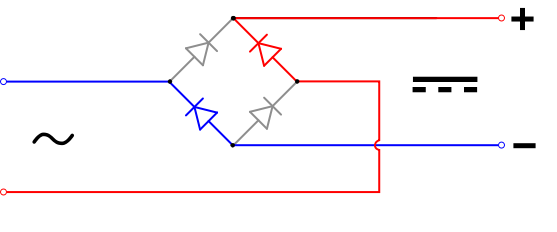
By connecting the positive and negative from your LED light(s) to the DC output of your bridge rectifier, and then connecting your single headlight circuit wire to one of the AC inputs of the bridge rectifier (it doesn't matter which AC input) and then attaching a wire from the metal of your snowblower to the other AC input you will have light! For safety purposes, it is recommended that you place a fuse on the headlight circuit wire before the bridge rectifier which should be about 5 amps rated fast blow, and then a fuse on the positive wiring between your bridge rectifier and your LED light that should be about ~1amp fast blow fuses. These fuse ratings are assuming you are using a headlight circuit that is rated for ~1amp at about 18volts, some headlight circuits are rated for 2, 3, or more amps, so using an amperage calculator like this one can help with both your LED light selection and your fuse selection. Volts/Amps/Watts Converter
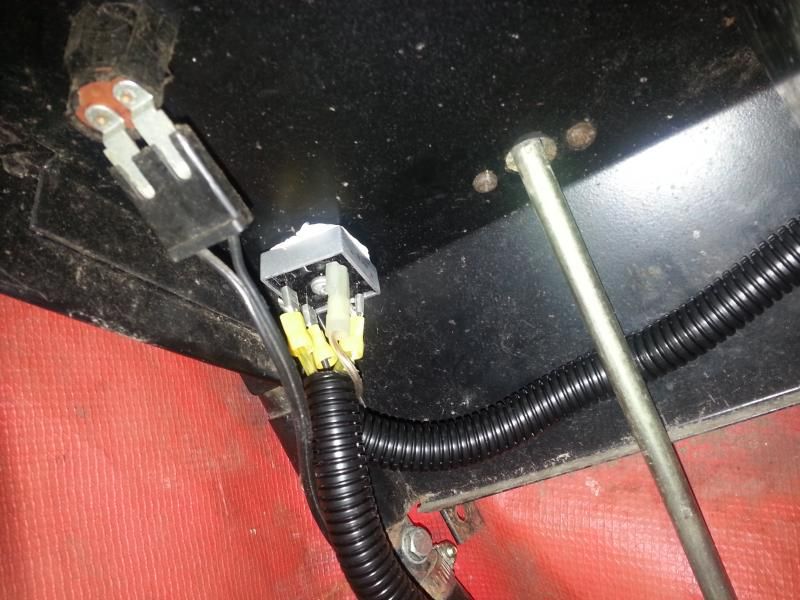
Here's a pic of how I installed my bridge rectifier, I mounted it right next to my keyed switch that is on my handlebar console. I also used heat sink paste to couple the bridge rectifier’s metal casing to the console’s metal. I know this is way overkill, but my bridge rectifier came with the paste, and it was an easy application of some paste. The bridge rectifier I used is rated at 50amps 100volts KBPC5010 Bridge Rectifier | Alltronics
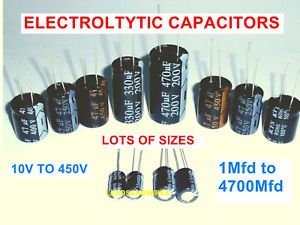
UPDATE: Using two 2200mfd 50v capacitors may be needed to clean up the voltage ripple that comes off of the DC output on your bridge rectifier. Some LED lights are sensitive to this ripple and may fail prematurely. Simply adding these capacitors in parallel on the DC output side of the bridge rectifier is a good precaution. Wire in the Capacitor(s) between the LED light(s) and the bridge rectifier. So the positive and negative of the bridge rectifier will go to the positive and negative of the capacitor. Then the positive and negative of the capacitor then get wired to the LED(s) positive and negative.
When choosing your LED lighting you typically have spotlights or flood lights available. Spotlights have a more pinpoint dispersion with very little side spill of light. Flood lights illuminate a wider area, and with the short distances (from LED light to relevant distance in front of your snowblower) you’ll want as wide dispersion as possible, or else you’ll get a tiny area in front of you illuminated. I made sure to get floodlights that were rated for voltage below what my snowblower headlight circuit tests at and above, so being that my snowblower headlight circuit tests at 18volts I picked a set of LED floodlights that were rated for 9-32 volts. I wanted to make sure that I would never be putting the floodlights in danger with whatever voltage the headlight circuit was producing, even a small voltage peak is accounted for. The floodlights I chose are 9 watts each, which is as much as my headlight circuit is rated for.
For those that appreciate a short(ish) video with some basic points noted here is a video.

https://www.youtube.com/watch?v=ZZwebMaiyBY
 
#567 ·
The blk wire has to be ground, since the light housing is all plastic I don't think it would be grounded through the mounting screws.

On a second note, Honda builds some well engineered power equipment but I gotta say the engineers and designers on this motor have their heads up their $ss. Reason being, who would not expect any customer not to want grip warmers as an option. My hands freeze operating that thing, now I'm looking to spend 60-100 bucks on a warm pair of ski gloves, not good

David
 
#576 ·
OK, back on the topic.

Based on only being able to use a single 15W LED light and using my stock engine mount for the light would it be better to use a 30 or 60 degree beam? The specs say it give off 1050 lumens.

Also, I'm going to use 2 capacitors rated at 1000 uf @ 35 V rather than the big ones (2200uf 50V) everyone is using. Will they be ok based on my low 15W system?

Thanks for any opinions

David
 
#582 ·
I noticed that too, no stickys.

I wasn't talking about someone moving off topic I'm talking about fifty pages of information on not only how to on the LED but specific problems on specific machines, different discussions on which LEDs, different testing, different stator upgrades, ....

That's what I'm talking about. Having a how to on the LED's and how to convert the AC to DC and parts is great. That should be it's own how to but once you have ten, twenty, thirty guys asking different questions that do have value but are buried in the thread the info's value is wasted compared to if they had started an individual thread on that topic. Like asking about upping a Honda's stator in this thread rather than asking it under the Honda sub forum where there are likely a lot of folks who might be interested if it works. I'm just suggesting how to make the information more available and searchable, not saying anything about going off topic.
 
#583 ·
I understand you better now, no worries. I thought from the image you attached that you were stating that the whole thread was wrecked from being off topic.
I'm happy to compile much of the information into the first post, it will just take me a while to edit things and put it all together into a comprehensive package. I have been brainstorming a simple "how to wire led upgrades " video. But I need to find time to put it together.
 
#590 · (Edited)
liftoff1967 said:
Isn't that the most frustrating thing!!
You're not kidding! I thought I planned this out pretty well ahead of time...but I guess that's why it only required one trip to the hardware store. :p

Coby7 said:
Okay, I was planning to post up a photo of these in the dark, but I haven't had a chance to get one yet. So here's a photo showing how I mounted everything:


The project box on the side of the frame houses the bridge rectifier, capacitors, fuses, and switch. The blower already had a mounting bracket on one side for a light, so I picked up an identical bracket for the other side from my local dealer.

While I'm at it, here are links to the bridge rectifier and lights that I used:

Amazon.com: TMH 10w Cree LED Work Light Square Shape 60 Degree Flood Beam Lamp Pack of 2: Automotive

50A 1000V Metal Case Bridge Rectifier with Heatsink KBPC5010 - Gas Welding Accessories - Amazon.com
 
#594 ·
I just got my first brand new snowblower. I actually got it at the end of the season last year but only used it a handful of times. I got an Ariens Compact 24.

The light is the only thing I dislike about it so far and I plan to install lights similar to what is here. My main problem is I cannot find the amp or wattage rating for this snowblower's light circuit. Ariens dose not give any info other than the replacement bulb part number. I tried to find the wattage of the bulb itself but no one who sells them gives any such information. I would guess other make machines are similar??

How did you folks find the maximum amount of draw you can put on your circuit? I would appreciate any advice.
 
#596 ·
I just got my first brand new snowblower. I actually got it at the end of the season last year but only used it a handful of times. I got an Ariens Compact 24.
How did you folks find the maximum amount of draw you can put on your circuit? I would appreciate any advice.
You can get the info you need from Ariens, ask them about your stator output and if you don't I wouldn't go beyond 15watts or 2 x 8 watt LED.
Good Luck
 
#598 ·
Thanks

I didn't think it would be marked because it isn't an industry standard bulb. After work I got a flashlight and there it was, 12V 20W.

This is also good because I was looking at dual 10W lamps. I'll post some pics when I finish. It may be a week or two. I am waiting to install the cab I ordered first so I can decide the best place for mounting.
 
#599 ·
I didn't think it would be marked because it isn't an industry standard bulb. After work I got a flashlight and there it was, 12V 20W.

This is also good because I was looking at dual 10W lamps. I'll post some pics when I finish. It may be a week or two. I am waiting to install the cab I ordered first so I can decide the best place for mounting.
Glad you got it figured out! Looking forward to seeing pictures of your install.
 
#603 ·
That is totally up to you. Since you now mentioned that you have such a high wattage AC circuit I would use the rectifier and be maxing out that AC circuit wattage with some crazy bright LEDs. But I'm a little nuts. :D You'll have plenty of light either way.
 
#604 ·
Hi again. I read through most of this thread. Very cool how these people shared their ideas and what was learned. I would like to ask for some advice and ask some questions.

Superedge suggests a 4 amp fuse on the AC side of the circuit and 1 amp fuses on the DC side. Why the difference? The 4 amp fuse I understand based on 1.5X, or so, of your circuit. Superedge, how did you size the 1 amp fuse? I would not have expected that much voltage drop across the rectifier. I estimate my circuit at 1.7 amp draw (based on 20W/12V) so I would have size mine for 2-3 amp fuses.

For the lights, I have narrowed my search down to two finalists. Has anyone used either of these? I am leaning towards the one from Amazon because it is brighter and I am putting together an order anyway, but the one from ebay appears to have better mounting hardware.


2pcs Car Motorcycle 10W LED Eagle Eye Backup Light DRL Running Lamp Cool White | eBay

Today or tomorrow, I will visit the Shack to start amassing the parts I need for this project.

The thing that set me into motion on this is the light on my new Ariens snowblower really blows (no pun intended). I found a second reason to hate it yesterday when I tried to remove the bulb. The bulb, unlike most standard bulbs, has the connector coming off at 90 degrees to the bulb. The instructions show the connector pointing down with the instructions saying, “turn CCW to remove”. On mine, the connector is to the side, so the chassis is in the way, and the bulb cannot be removed without removing the entire light assembly. Who designs this stuff?

Thanks for reading.
Regards, Mike
 
#605 ·
Hi again. I read through most of this thread. Very cool how these people shared their ideas and what was learned. I would like to ask for some advice and ask some questions.

Superedge suggests a 4 amp fuse on the AC side of the circuit and 1 amp fuses on the DC side. Why the difference? The 4 amp fuse I understand based on 1.5X, or so, of your circuit. Superedge, how did you size the 1 amp fuse? I would not have expected that much voltage drop across the rectifier. I estimate my circuit at 1.7 amp draw (based on 20W/12V) so I would have size mine for 2-3 amp fuses.

For the lights, I have narrowed my search down to two finalists. Has anyone used either of these? I am leaning towards the one from Amazon because it is brighter and I am putting together an order anyway, but the one from ebay appears to have better mounting hardware.

XCSOURCE 9W 9-30V 60 Degree 1800 Lumen LED Floodlight Lamp Work Light for Working / Driving / Fog, Off Road Flood light-Jeep Cabin, Boat, SUV, Truck, Car, ATVs Fishing Driving Light Waterproof Round Car Lamp IP67 LD326A - - Amazon.com

2pcs Car Motorcycle 10W LED Eagle Eye Backup Light DRL Running Lamp Cool White | eBay

Today or tomorrow, I will visit the Shack to start amassing the parts I need for this project.

The thing that set me into motion on this is the light on my new Ariens snowblower really blows (no pun intended). I found a second reason to hate it yesterday when I tried to remove the bulb. The bulb, unlike most standard bulbs, has the connector coming off at 90 degrees to the bulb. The instructions show the connector pointing down with the instructions saying, “turn CCW to remove”. On mine, the connector is to the side, so the chassis is in the way, and the bulb cannot be removed without removing the entire light assembly. Who designs this stuff?

Thanks for reading.
Regards, Mike
I like to put very small fuses near the most fragile electronics- the LED's, so I was throwing out a recommendation of very small amperage, though depending on the over all voltage drop if the end user likes to back off of the throttle a lot (I never do) when the blower is just sitting and running- there may be need for raising the amperage of the fuse a touch or else it may blow when no danger is apparent.
Most of the LED's that we are all using are rated for a wide range of voltages, so they have an internal "driver" circuit that will pull whatever amperage needed to give full lighting power at whatever voltage it is seeing (within its rated range)
No one on the forum has posted that they used the lights that you linked to, so let us know if you like them. Most have used something like these and have worked ok when using a capacitor to smooth out the dirty DC coming off of the rectifier.
2"10W CREE Offroad Flood LED Work Light Bar Motorcycle Driving Fog Lamp 12V Boat | eBay
 
#606 ·
Vibration damage of LEDs?

I noticed several guys here have used rubber to dampen vibration to protect the light. Is this really necessary? I would expect LED light to tolerate much more vibration than a halogen bulb and the halogen bulb is hard mounted.

Is this necessary? Or just glorious overkill?

I know some people have had LED lights fail, but looking at the thread most of them appear to have skipped the filtering cap.

When I do my upgrade it would be much easier if I could skip the rubber bushings.

(And many thanks to all of you. This thread has already saved me a BUNCH of time and potential mistakes.)
 
#607 ·
I noticed several guys here have used rubber to dampen vibration to protect the light. Is this really necessary? I would expect LED light to tolerate much more vibration than a halogen bulb and the halogen bulb is hard mounted.

Is this necessary? Or just glorious overkill?

I know some people have had LED lights fail, but looking at the thread most of them appear to have skipped the filtering cap.

When I do my upgrade it would be much easier if I could skip the rubber bushings.

(And many thanks to all of you. This thread has already saved me a BUNCH of time and potential mistakes.)
I agree with you, the rubber isn't a bad addition, but probably overkill
 
#608 ·
How do I determine the amperage of my stator

I need to pick a set of 2 LED lights for my blower. It seems like my choices are around 10 Watts (per unit) or around 18 watts per unit. I want to install 2 lights.

Obviously I would prefer the 18 watt units for brightness, but can my stator take it?

My plan it to wire a SPDT toggle switch to that I am running the stock halogen lamp or the LEDs, but never both at the same time.

The unit is a Husqvarna 1830HV (no heated grips).

So how do I determine how much power I can safely draw?
 
#609 ·
I need to pick a set of 2 LED lights for my blower. It seems like my choices are around 10 Watts (per unit) or around 18 watts per unit. I want to install 2 lights.

Obviously I would prefer the 18 watt units for brightness, but can my stator take it?

My plan it to wire a SPDT toggle switch to that I am running the stock halogen lamp or the LEDs, but never both at the same time.

The unit is a Husqvarna 1830HV (no heated grips).

So how do I determine how much power I can safely draw?
In many cases the stator is sized to only handle the stock headlight wattage, so checking the stock halogen bulb will tell you the wattage. In the case that the stator may be able to produce more watts /amps than the stock headlight - you'll have to call husqvarna to see if they'll tell you your stator amperage rating.
 
#613 ·
"Halogen is antiquated and can /will fail when you need it most."

My older machines all have incandescent and I haven't had any problems with bulbs. You just need to keep a spare handy as it will burn out sooner or later. I've had LEDs burn out on my cars so it's not like they live forever either.

The nice thing is you can just mount an incandescent and run a wire to the engine and it will work with whatever the engines able to produce (AC or DC) so you don't need a run to Radio Shack for parts and dig out your soldering gun. That said I have modified two to use LEDs.

I just don't think it's time to toss incadescents under the bus, yet.
For 10-14 bucks and four feet of wire a cheap Tractor Supply, Walmart, Northern tool, Harbor Freight, Auto Parts Store ,,, 18 watt sealed beam gets you some safety out there in the dark, cheap and easy.
.
Image
 
#614 ·
I'm not trying to start a debate really, but I guess that is because I feel there is no debate. :D
LED's are rated for thousands more hours than incandescent bulbs. Typically the reason that LED's fail early is because of component failure other than the bulb. LED driver technology, as well as proper heat sinking has gotten better, making premature LED failure much less likely.
I guess that I feel like picking halogen over LED is like picking a horse drawn carriage over a car and having to replace a horse from time to time. Sure there are other complications with picking a car over a horse drawn carriage, but the benefits far outweight the disadvantages. But that is just how I feel on the subject.
 
#616 · (Edited)
In looking for my lighting options, I happened on this thread, great thread....


I have a Toro 1128OXE.

Went to my local shop, and they wanted 23bux for the stock bulb in a Toro box.
So online we went.
Found the exact replacement bulbs on RockAuto for $3.80 each.

Was hoping someone came out with an LED that went into the housing.
So kept looking on line.
And found this thread.

I found some LED driving lights on amazon, that fit right into the stock housing, but even though they said they were good for 32Vdc in *some* of the advertising, the one I tested blew out when installed into the Toro.
So I guess only designed for the typical 12vdc car system.

I also ordered two of these as a backup..
Lemonbest® 10w 12v Silver LED Underwater Flood Light, IP68 Waterproof Landscape Fountain Lamp, Warm White - Pond Lights - Amazon.com

They have reverse polarity protection, which should indicate their front end has a fullwave bridge rectifier in it's front end.

With the stock 16w halogen light bulb, I tested my Toro's AC light generator, and at Full RPM I get 13.8vac rms, and at idle 9vac rms.

I checked the LED lights I provided a link to, using dc supply on the bench.
Yes, polarity is no concern.
And each drew .250amps at 14vdc.

As couple of posters had mentioned in the thread, these LED assemblies have a "driver" and the driver is "constant power" , not resistive as a normal incandescent bulb is primarily.
So as input voltage decreases, input current increases, till the input is out of the operational range of the circuit. Than things start running out of soap and input current decreases till the driver circuit shuts off.


At 11vdc in, the pair drew 1.3amps , below 11vdc the driver started shutting down, and current decreased quickly.
Above 11vdc, the input current of course decreased.

Testing just one on my Toro at full RPM, the voltage from the generator is 19vac rms with the load of just one.
Tried Two of them, generator output is at 16vac rms, so even with two, not loading the generator as much as the stock 16watt bulb.
I did not notice any flicker.
So no bridge and no cap to add (at least for my Toro)
I tested one at low RPM, but don't remember what the vac rms was.. and forgot to test the two at low rpm.
but at this point, not worried , moving ahead with installing them.

So I can use two of them, keeping the idle up so as not to stress the windings of the generator, or I'll find a water proof switch and just turn on the light when I need them.

I'll remove the stock light housing and install one of them on the stock bracket.

I just ordered a set of stock Toro light bracket parts.
I'll put another one on the other side in the same location as the stock light.

With two, one on each side of the blower , they really paint the area with light. The stock housing had a defused lens, which did well as a flood light, but it was barely usable light, better than nothing.
The two of these are a HUGE improvement.

The other nice thing about the light I linked to above, is the color range, down in the 3500 range.. not a bright blue white or warm white light, which gets tough on the snow.
Down on the 3500 range, its' getting closer to the color of incandescent lighting, to me helping to reduce the glare off the snow.


So for me the pluses are..
going to LED,
- I can add another light and cover more areas, with the 1 halogen my generator was at max load.
- LED should last longer, although, depends on the design as others have mentioned, another factor is if the LED is driven too hard, they dim over time more quickly.
- seems with this model LED light, for me, no bridge needed, no flicker seen.
- with the way I'm doing it, I can go back to the original single halogen light if these LED lights crap out on me.
 
#720 · (Edited)
So easy quick install.

I purchased a 2nd Toro bracket, U bolt, and hardware from Jacks, for about 10bux.

Removed the old light.
Installed new bracket on the other side.
Installed new lights.

I had purchased a mate for the existing plug for the existing Toro light.

Wired up the lights to a switch that's meant for the ATVs and adding lights.

At full throttle, about 17.5vac @ .650Amps, so even with the two of these LED lights, much lighter load than the stock halogen (was at 13.5vac) which has less light output.

Mid throttle I hit 1amp, and than the drivers start shutting down, and the current decreases. So no real need for the switch, but most of my snow removal is in the day light, so it will save life on the LEDs.
Depending on the design, how over driven they are or not, they can dim as the hours accumulate.

These lights from Amazon, with the reverse polarity protection have the Full wave bridge built into them, so just wire up and go... no need to mount and wire a bridge rectifier.

I originally tested with just one, and it was @ 19VAC, before wiring it all up, there was no flicker. Being at 17.5VAC, I expect all to be the same and the brightness not much difference.
With the original 1 light setup, I had terrible shadows on the left side of the machine from the chute and motor, expect all of that to be gone now.

EDIT, adding night time pix...

Image


Image


Image


In looking for my lighting options, I happened on this thread, great thread....


I have a Toro 1128OXE.

Went to my local shop, and they wanted 23bux for the stock bulb in a Toro box.
So online we went.
Found the exact replacement bulbs on RockAuto for $3.80 each.

Was hoping someone came out with an LED that went into the housing.
So kept looking on line.
And found this thread.

I found some LED driving lights on amazon, that fit right into the stock housing, but even though they said they were good for 32Vdc in *some* of the advertising, the one I tested blew out when installed into the Toro.
So I guess only designed for the typical 12vdc car system.

I also ordered two of these as a backup..
Lemonbest® 10w 12v Silver LED Underwater Flood Light, IP68 Waterproof Landscape Fountain Lamp, Warm White - Pond Lights - Amazon.com

They have reverse polarity protection, which should indicate their front end has a fullwave bridge rectifier in it's front end.

With the stock 16w halogen light bulb, I tested my Toro's AC light generator, and at Full RPM I get 13.8vac rms, and at idle 9vac rms.

I checked the LED lights I provided a link to, using dc supply on the bench.
Yes, polarity is no concern.
And each drew .250amps at 14vdc.

As couple of posters had mentioned in the thread, these LED assemblies have a "driver" and the driver is "constant power" , not resistive as a normal incandescent bulb is primarily.
So as input voltage decreases, input current increases, till the input is out of the operational range of the circuit. Than things start running out of soap and input current decreases till the driver circuit shuts off.


At 11vdc in, the pair drew 1.3amps , below 11vdc the driver started shutting down, and current decreased quickly.
Above 11vdc, the input current of course decreased.

Testing just one on my Toro at full RPM, the voltage from the generator is 19vac rms with the load of just one.
Tried Two of them, generator output is at 16vac rms, so even with two, not loading the generator as much as the stock 16watt bulb.
I did not notice any flicker.
So no bridge and no cap to add (at least for my Toro)
I tested one at low RPM, but don't remember what the vac rms was.. and forgot to test the two at low rpm.
but at this point, not worried , moving ahead with installing them.

So I can use two of them, keeping the idle up so as not to stress the windings of the generator, or I'll find a water proof switch and just turn on the light when I need them.

I'll remove the stock light housing and install one of them on the stock bracket.

I just ordered a set of stock Toro light bracket parts.
I'll put another one on the other side in the same location as the stock light.

With two, one on each side of the blower , they really paint the area with light. The stock housing had a defused lens, which did well as a flood light, but it was barely usable light, better than nothing.
The two of these are a HUGE improvement.

The other nice thing about the light I linked to above, is the color range, down in the 3500 range.. not a bright blue white or warm white light, which gets tough on the snow.
Down on the 3500 range, its' getting closer to the color of incandescent lighting, to me helping to reduce the glare off the snow.


So for me the pluses are..
going to LED,
- I can add another light and cover more areas, with the 1 halogen my generator was at max load.
- LED should last longer, although, depends on the design as others have mentioned, another factor is if the LED is driven too hard, they dim over time more quickly.
- seems with this model LED light, for me, no bridge needed, no flicker seen.
- with the way I'm doing it, I can go back to the original single halogen light if these LED lights crap out on me.
6735676669838560