

I have only used Parker, my snowblower, for a few hours thus far – and the majority of that time was spent trying to unclog the chute / impeller housing!! The snow was wet and heavy and I expect to receive more snow like that, especially as we see temperatures slowly rising. I hope they don’t rise too far, though, or else Parker will be extremely bored!
So, after much research both on this very helpful forum and on Youtube, I decided to do the impeller modification; whereby the gap between the end of the impeller and the blower housing is closed by attaching some form of rubberised material to the impeller.
For anyone reading this down the line, bear in mind there are various ways of installing this modification and various materials one can use. I’m sharing this information in this thread to outline the way I chose to do mine – you may find another way that suits you better.
I spent a long time researching this modification and my starting point was to do it in a way that involved the least amount of struggling and offered the most amount of precision fitting.
So I chose to remove the impeller completely to do this task. This also allowed me to become mechanically familiar with the auger system and other internals of the housing. It also offered an opportunity to lubricate all those parts that need it, etc. It also allows service to items that may be seized or corroded.
I decided to go the route of using stainless (316) 1 inch x 5/16 bolts, 3/4 inch washers and nylock nuts. This was so that if I wanted to replace or service the rubber in the future, it would be a lot easier to remove those than trying to remove self-drilling screws, which can be tough to get out.
When using stainless bolts and nuts together it’s crucial that lots of Copperslip (AKA Anti Seize) is used on the threads to prevent galling / binding. I had no problems because I used a lot and kept the friction very low but I have had issues in the past. So using lots of anti seize with stainless on stainless fasteners is a very good tip.
After much research and asking around I found the most popular material that people used for the rubber part was 2 ply baler belting. For me, and many others, it offers a good balance between torsional strength balanced by flexibility to deal with the variations in the housing structure and to allow for an interference fit whilst not so being so rigid to stop the impeller turning at all – which I have seen happen.
Once I had the impeller out, it struck me that this was not going to be as straightforward as I had first thought. The current HSS Honda blowers have a support bar running around the underside of the impeller paddle surface and this feature proves to be a challenge regarding where one can drill into the impeller. Drilling through the chute opening (with the impeller still in the housing) and guessing where the bar is on the other side can just as easily end up with one drilling into the bar – ask me how I know this 😉
So I was even more happy that I had chosen to remove the impeller as doing so allowed me to make accurate measurements of where I could and couldn’t drill.
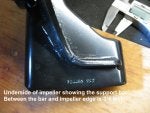
Although not an exact science, it seems that most people, including me, feel it desirable to have at least 2 bolts near the impeller edge to help secure the rubber in place. The bar on the underside of Honda impellers is situated such that you have to have your bolts installed between the impeller front edge and the bar itself. This results in you having about 0.375 of an inch on centre to play with.
Having to have the bolts located in that position also meant that I couldn’t use the 1.5 inch fender washers that I had planned on. This is because the large fender washers would mean the centre hole would have been drilled through the underside support bar.
So in the end I had to use ¾ inch washers under the bolt head on the top side of the impeller paddle which allowed the hole on the underside of the paddle, where the nut would be, to be 0.375 on centre which was exactly half way between the underside support bar and the impeller leading edge.
I enjoy precision mechanics and engineering (I’m not much cop at it but I enjoy it) but I could have made life much easier for myself by using 1 inch x ¼ inch bolts and half inch washers (instead of 1 inch by 5/16 and ¾ inch washers). Those are the sizes I would recommend anyone to use who wanted to try my install. I would have had a little more wiggle room between the support bar and impeller edge, but the truth is I was too lazy to order any changes. Once I get my mind set into a job I tend to be very focused on it to the point where I must finish it with what I purchased originally to complete the job.
Anyway, I believe in measuring 5 times and and drilling ten times. Hahahhahahaha. It feels like that sometimes. I had fun using my new micrometer and a bit of guess work. First marks were made using my automatic punch. Then I made pilot holes using 1/8 cobalt bits were drilled, followed by big daddy cobalt bit 5/16. I found using more cooling oil than normal while drilling helped, plus not drilling too fast of course.
Once I had my holes drilled I measured and cut the baler belt 2 inches by 3 ¼ inches. I did a lot of measuring in the auger housing before the job and I ascertained that the biggest gap between impeller end and the housing was 2/8s or about 5/16ths. I marked a line measuring 2/8ths of an inch on the end of the rubber which would be the amount of rubber overhang, so to speak, from the end of the impeller.
I then laid the rubber on the impeller and using a punch through the drill holes, marked the rubber where it had to be drilled. Holes were drilled in the rubber and I had to use a 7/16ths (or maybe half inch) drill bit to make holes big enough for the bolts to go through without fighting with them.
Copious amounts of ant seize (Copperslip) were used on the stainless hardware to prevent binding and the first of Parker’s new snow boots was on!! I was very chuffed with myself as usually by this stage I have thrown the job through the window with frustration. I installed the impeller temporarily in the housing to check the rubber fit and it looked good. So I decided to fit the second rubber paddle with the impeller on the bench.
I then, after lubing up the blower housing, installed the impeller with 2 of 3 paddles installed into the blower housing. I decided I would do this and then install the 3rd paddle with the impeller in situ in the housing. It was a bit fiddly but I did it. I ended up installing the 3rd set of bolts by accessing them through the front of the auger housing, using 2 small ½ inch by ¼ inch drive sockets.
So I had all 3 rubber paddles now installed and the impeller installed inside the housing.
Everything else was then put back, taking the opportunity to grease and lube everything. I had a temporary panic when I suddenly went blank and forgot how to align the hole in the transmission shaft into the auger / impeller shaft. I blame my very rude mailman for putting me off my stride – don’t ask.
Here are some photos showing the various stages of the job. Thanks for reading and I hope maybe one day it helps someone out. All I need now is some snow!!! But I’ll take slush, too, now that I’ve done the anti clog modification 😉
So, after much research both on this very helpful forum and on Youtube, I decided to do the impeller modification; whereby the gap between the end of the impeller and the blower housing is closed by attaching some form of rubberised material to the impeller.
For anyone reading this down the line, bear in mind there are various ways of installing this modification and various materials one can use. I’m sharing this information in this thread to outline the way I chose to do mine – you may find another way that suits you better.
I spent a long time researching this modification and my starting point was to do it in a way that involved the least amount of struggling and offered the most amount of precision fitting.
So I chose to remove the impeller completely to do this task. This also allowed me to become mechanically familiar with the auger system and other internals of the housing. It also offered an opportunity to lubricate all those parts that need it, etc. It also allows service to items that may be seized or corroded.
I decided to go the route of using stainless (316) 1 inch x 5/16 bolts, 3/4 inch washers and nylock nuts. This was so that if I wanted to replace or service the rubber in the future, it would be a lot easier to remove those than trying to remove self-drilling screws, which can be tough to get out.
When using stainless bolts and nuts together it’s crucial that lots of Copperslip (AKA Anti Seize) is used on the threads to prevent galling / binding. I had no problems because I used a lot and kept the friction very low but I have had issues in the past. So using lots of anti seize with stainless on stainless fasteners is a very good tip.
After much research and asking around I found the most popular material that people used for the rubber part was 2 ply baler belting. For me, and many others, it offers a good balance between torsional strength balanced by flexibility to deal with the variations in the housing structure and to allow for an interference fit whilst not so being so rigid to stop the impeller turning at all – which I have seen happen.
Once I had the impeller out, it struck me that this was not going to be as straightforward as I had first thought. The current HSS Honda blowers have a support bar running around the underside of the impeller paddle surface and this feature proves to be a challenge regarding where one can drill into the impeller. Drilling through the chute opening (with the impeller still in the housing) and guessing where the bar is on the other side can just as easily end up with one drilling into the bar – ask me how I know this 😉
So I was even more happy that I had chosen to remove the impeller as doing so allowed me to make accurate measurements of where I could and couldn’t drill.
Although not an exact science, it seems that most people, including me, feel it desirable to have at least 2 bolts near the impeller edge to help secure the rubber in place. The bar on the underside of Honda impellers is situated such that you have to have your bolts installed between the impeller front edge and the bar itself. This results in you having about 0.375 of an inch on centre to play with.
Having to have the bolts located in that position also meant that I couldn’t use the 1.5 inch fender washers that I had planned on. This is because the large fender washers would mean the centre hole would have been drilled through the underside support bar.
So in the end I had to use ¾ inch washers under the bolt head on the top side of the impeller paddle which allowed the hole on the underside of the paddle, where the nut would be, to be 0.375 on centre which was exactly half way between the underside support bar and the impeller leading edge.
I enjoy precision mechanics and engineering (I’m not much cop at it but I enjoy it) but I could have made life much easier for myself by using 1 inch x ¼ inch bolts and half inch washers (instead of 1 inch by 5/16 and ¾ inch washers). Those are the sizes I would recommend anyone to use who wanted to try my install. I would have had a little more wiggle room between the support bar and impeller edge, but the truth is I was too lazy to order any changes. Once I get my mind set into a job I tend to be very focused on it to the point where I must finish it with what I purchased originally to complete the job.
Anyway, I believe in measuring 5 times and and drilling ten times. Hahahhahahaha. It feels like that sometimes. I had fun using my new micrometer and a bit of guess work. First marks were made using my automatic punch. Then I made pilot holes using 1/8 cobalt bits were drilled, followed by big daddy cobalt bit 5/16. I found using more cooling oil than normal while drilling helped, plus not drilling too fast of course.
Once I had my holes drilled I measured and cut the baler belt 2 inches by 3 ¼ inches. I did a lot of measuring in the auger housing before the job and I ascertained that the biggest gap between impeller end and the housing was 2/8s or about 5/16ths. I marked a line measuring 2/8ths of an inch on the end of the rubber which would be the amount of rubber overhang, so to speak, from the end of the impeller.
I then laid the rubber on the impeller and using a punch through the drill holes, marked the rubber where it had to be drilled. Holes were drilled in the rubber and I had to use a 7/16ths (or maybe half inch) drill bit to make holes big enough for the bolts to go through without fighting with them.
Copious amounts of ant seize (Copperslip) were used on the stainless hardware to prevent binding and the first of Parker’s new snow boots was on!! I was very chuffed with myself as usually by this stage I have thrown the job through the window with frustration. I installed the impeller temporarily in the housing to check the rubber fit and it looked good. So I decided to fit the second rubber paddle with the impeller on the bench.
I then, after lubing up the blower housing, installed the impeller with 2 of 3 paddles installed into the blower housing. I decided I would do this and then install the 3rd paddle with the impeller in situ in the housing. It was a bit fiddly but I did it. I ended up installing the 3rd set of bolts by accessing them through the front of the auger housing, using 2 small ½ inch by ¼ inch drive sockets.
So I had all 3 rubber paddles now installed and the impeller installed inside the housing.
Everything else was then put back, taking the opportunity to grease and lube everything. I had a temporary panic when I suddenly went blank and forgot how to align the hole in the transmission shaft into the auger / impeller shaft. I blame my very rude mailman for putting me off my stride – don’t ask.
Here are some photos showing the various stages of the job. Thanks for reading and I hope maybe one day it helps someone out. All I need now is some snow!!! But I’ll take slush, too, now that I’ve done the anti clog modification 😉


")


