Snowblower Forum banner

Upgrading your snowblower lights to LED lights (Please see 1st post edit/mouseover this link)

1.1M views 1.6K replies 274 participants last post by  FarmerBob  
#1 ·
[Edit: LED technology has improved exponentially since this thread was started. Be aware that earlier posts may be somewhat outdated, and that you will likely find the most useful information in later updates. Y.R.]

In this thread, we'll talk about the do's and don'ts of LED headlight upgrades for your snowblower, and post videos and pictures of our successes.
There are many models of snowblowers that have a headlight circuit, In most cases, you can find a single wire that registers at anywhere from 12v to 20v AC (with no load) that is located somewhere on the engine, many times under the gas tank. Halogen lights are the typical light that comes with many of our snowblowers. Many of us want much more light than what the halogen bulb can give us, as well as better reliability than a halogen bulb. The search for something brighter and more reliable ends with the LED light. LED's (Light Emitting Diodes) are extremely efficient, very bright, and have thousands of hours of reliable use.
Since the lighting circuit is typically AC current at somewhere between 40-60hertz, if you just attach an LED light to the circuit you'll get pulsing light (think on and off 40-60 times a second) This is caused by the nature of an LED, because an LED is polarity sensitive, and has no warm-up or cool down time when compared to a halogen bulb filament, the LED will flicker noticeably. The flickering of an LED on AC current is mildly annoying to many people, but VERY annoying when you are attaching it to a moving object like a snowblower. An LED that is in motion when attached to AC current (for reasons I won't even begin to get into) flickers much more noticeably. To test this for yourself, take a strand of LED Christmas lights, plug them in, and then swing them in front of you at arm's length, you'll see a strobing or flickering effect.
You can see many LED headlight upgrade videos on youtube like this one, where you can definitely see the flickering or strobing of the LED's. You can see the effect the flicker has on the video camera, you get weird tracks that go from top to bottom of the video frame.
1. EXAMPLE OF IMPROPER LED LIGHT INSTALL- NOTICE THE FLICKERING
2. EXAMPLE OF YET AGAIN AN IMPROPER LED LIGHT INSTALL- NOTICE THE FLICKERING
This is what it looks like once you add a bridge rectifier, even though you’ll see a tiny bit of flicker in the video, in person there is none, you also can notice that there is no “tracking” effect like in the other videos.

The problem of light flicker is solved by using a full wave bridge rectifier.
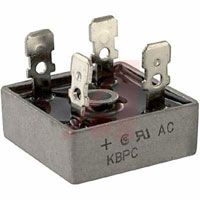
A bridge rectifier takes AC current and changes it into DC current using 4 diodes.
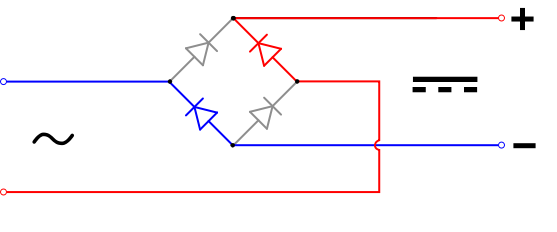
By connecting the positive and negative from your LED light(s) to the DC output of your bridge rectifier, and then connecting your single headlight circuit wire to one of the AC inputs of the bridge rectifier (it doesn't matter which AC input) and then attaching a wire from the metal of your snowblower to the other AC input you will have light! For safety purposes, it is recommended that you place a fuse on the headlight circuit wire before the bridge rectifier which should be about 5 amps rated fast blow, and then a fuse on the positive wiring between your bridge rectifier and your LED light that should be about ~1amp fast blow fuses. These fuse ratings are assuming you are using a headlight circuit that is rated for ~1amp at about 18volts, some headlight circuits are rated for 2, 3, or more amps, so using an amperage calculator like this one can help with both your LED light selection and your fuse selection. Volts/Amps/Watts Converter
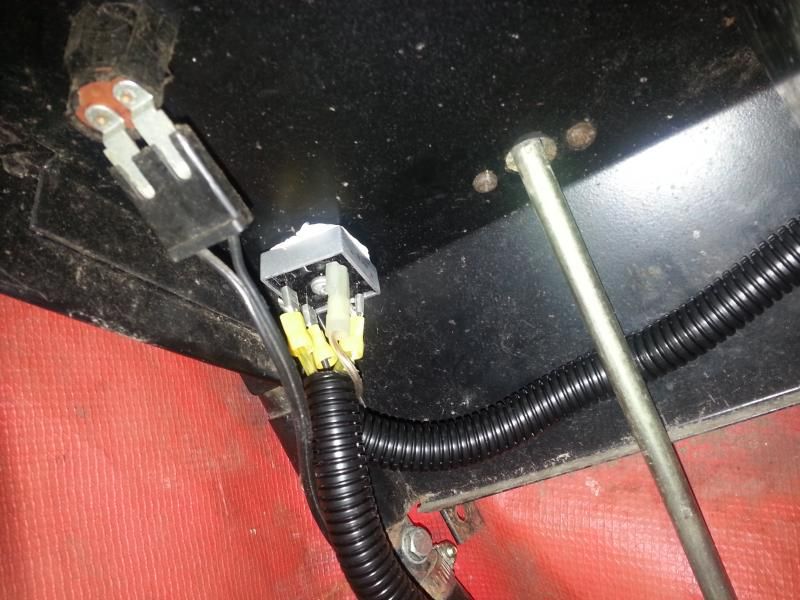
Here's a pic of how I installed my bridge rectifier, I mounted it right next to my keyed switch that is on my handlebar console. I also used heat sink paste to couple the bridge rectifier’s metal casing to the console’s metal. I know this is way overkill, but my bridge rectifier came with the paste, and it was an easy application of some paste. The bridge rectifier I used is rated at 50amps 100volts KBPC5010 Bridge Rectifier | Alltronics
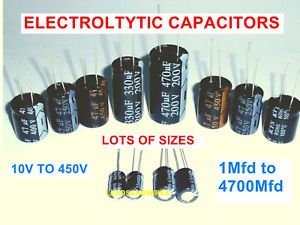
UPDATE: Using two 2200mfd 50v capacitors may be needed to clean up the voltage ripple that comes off of the DC output on your bridge rectifier. Some LED lights are sensitive to this ripple and may fail prematurely. Simply adding these capacitors in parallel on the DC output side of the bridge rectifier is a good precaution. Wire in the Capacitor(s) between the LED light(s) and the bridge rectifier. So the positive and negative of the bridge rectifier will go to the positive and negative of the capacitor. Then the positive and negative of the capacitor then get wired to the LED(s) positive and negative.
When choosing your LED lighting you typically have spotlights or flood lights available. Spotlights have a more pinpoint dispersion with very little side spill of light. Flood lights illuminate a wider area, and with the short distances (from LED light to relevant distance in front of your snowblower) you’ll want as wide dispersion as possible, or else you’ll get a tiny area in front of you illuminated. I made sure to get floodlights that were rated for voltage below what my snowblower headlight circuit tests at and above, so being that my snowblower headlight circuit tests at 18volts I picked a set of LED floodlights that were rated for 9-32 volts. I wanted to make sure that I would never be putting the floodlights in danger with whatever voltage the headlight circuit was producing, even a small voltage peak is accounted for. The floodlights I chose are 9 watts each, which is as much as my headlight circuit is rated for.
For those that appreciate a short(ish) video with some basic points noted here is a video.

https://www.youtube.com/watch?v=ZZwebMaiyBY
 
#1,391 ·
I've got the 12 volt battery start 1332 Pro. So no need for bridge rectifiers & capacitors. I'll run wires and relay from the battery to a 70 watt lightbars mounted to the bucket. There is already a plug & play Luyed
900 Lumens superbright 3014 led that fits in the stock 808 or 880 socket headlight. That also isn't
hooked to a bridge rectifier and capacitor. It doesn't
ficker but is a higher temperature and therefore whiter than the original halogen, which I think is similar to an H1. It would probably be a lot brighter than the halogen if hooked to a rectifier to convert to DC, but I'm going to disconnect from the wiring which I think runs off the alternator and hook to my battery circuit with the lightbar, along with a switch,
which will be DC. I guess the hand grips are also run off the stator and I'll probably leave that alone
Stephen
 
#1,392 · (Edited)
New kid here, came across this forum and thread while looking to add light to my old blower.

Over the last 4 days, I read Every. Single. Post... :geek: 7 years and 1,391 posts later, and I gotta say - what a ride!

It's awesome the work, energy and thought some of you put into this thread. Discussions ranged all over the place, from electrical theory to safety, and most impressive - only once or twice did I notice any of the usual internet snark!

Thank you very much to the original poster, as well as the other 3 or 4 really knowledgeable people who have taken up the torch over the years and kept everyone safe and answered their questions.

I'm waiting on parts, but I'm going to give this a go with an old led I picked up at a garage sale. I will say this for anyone who finds this thread after me - it's not really necessary to read the entire thread o_O

Most of the essential information is contained in the first 10 pages and the last 10-15. The stuff in between is some great theory, and a lot of discussion about specific blower models (try searching for your model).

If you're not sure if you need the capacitors, filters, rectifier and fuses - I would say why not? If you can afford it, it won't hurt anything, and several people who tried without have come back to say one or more of those components actually was required ;)

Later, near the end of the thread, a suggestion is made to add a DC-DC Voltage regulator - while not strictly necessary, I would say this will increase your odds of success as well as ensuring compatibility with the widest range of lights.

Once I get my parts and have some time maybe I'll put together a summary/updated generic how-to.

Once again - thanks to all who contributed to this thread, I've learned a lot!
 
#1,404 ·
Once I get my parts and have some time maybe I'll put together a summary/updated generic how-to.
I'd love to see that as I don't really have the time to read though all of it and it might be the only way for me to accomplish this. The light I have works okay, but adding something brighter would really be nice.
 
#1,393 ·
Well I originally posted this in the Cub Cadet forum, but thought I'd duplicate it here just for ideas to others. My FIL gave me his 3x (probably 3-4 years old). I had done the rectifier and lights on my previous snowblower, but new blower means new setup!

So I followed the wiring diagram previously posted in the "My led project" topic, I also installed a couple of lighted switches, one for factory light (converted to LED), one for floods. I mounted my project box using a horizontal bar clamp mount, I had originally thought about mounting my lights on these, (they also make a vertical mount) but then came up with the drift cutter design and couldn't be happier!

https://www.amazon.ca/dp/B01MXQCOWI?ref=ppx_pop_mob_ap_share


20201115_135438.jpg


20201115_135442.jpg


A buddy of mine builds custom motorcycles, so he was nice enough to make me these awesome light mounts from my little cardboard prototype. I didn't want to drill holes, so figured why not use the drift cutter mount! Works awesome, and I could actually still mount the drift cutters if I wanted to.


20201117_151741.jpg


(This was before he welded it up, cleaned it up and powder coated it for me) it fits PERFECTLY!

I mounted the light up switches just to the inside of each hand grip

170903


Here is the wire routing and finished light mounts

170904


170905


170906


Waited until dark, and snapped some pics. I'm not sure if the normal factory light is usually this pathetic, or if the led doesn't utilize the halogen light housing properly to project it, but this is the factory light only (but an led)

170908


But REALLY happy with the forward mounted led's!!

170909


Here's with both sets of lights on

170939


Haven't used it yet, as you can see we have been lucky in that department so far!
 
#1,401 ·
Well I originally posted this in the Cub Cadet forum, but thought I'd duplicate it here just for ideas to others. My FIL gave me his 3x (probably 3-4 years old). I had done the rectifier and lights on my previous snowblower, but new blower means new setup!

So I followed the wiring diagram previously posted in the "My led project" topic, I also installed a couple of lighted switches, one for factory light (converted to LED), one for floods. I mounted my project box using a horizontal bar clamp mount, I had originally thought about mounting my lights on these, (they also make a vertical mount) but then came up with the drift cutter design and couldn't be happier!

Lightronic LED Off-Road Light Horizontal Bar Clamp Mounting Kit 0.75"/ 1"/ 1.25" for Light Bar Bull Bar Tube Clamp Roof Roll Cage Holder Includes Allen Hex Key, Light Bars - Amazon Canada


20201115_135438.jpg


20201115_135442.jpg


A buddy of mine builds custom motorcycles, so he was nice enough to make me these awesome light mounts from my little cardboard prototype. I didn't want to drill holes, so figured why not use the drift cutter mount! Works awesome, and I could actually still mount the drift cutters if I wanted to.


20201117_151741.jpg


(This was before he welded it up, cleaned it up and powder coated it for me) it fits PERFECTLY!

I mounted the light up switches just to the inside of each hand grip

170903


Here is the wire routing and finished light mounts

170904


170905


170906


Waited until dark, and snapped some pics. I'm not sure if the normal factory light is usually this pathetic, or if the led doesn't utilize the halogen light housing properly to project it, but this is the factory light only (but an led)

170908


But REALLY happy with the forward mounted led's!!

170909


Here's with both sets of lights on

View attachment 170939

Haven't used it yet, as you can see we have been lucky in that department so far!
When I get around to doing this, I'm sold on the bucket mount. No shadow area and you can see exactly what is just about to go into the auger. A light that shines 50 feet out is nice for lining up your path, but between the chute and the bucket, handlebar mounts have that shadow. Might consider whether one light mounted on one side favoring the chute, and another mounted to the handlebar area offset to the opposite side would be ideal. I gotta find out how much juice I have LOL.-Mike
 
#1,395 ·
How can I tell how big/type of an LED I can put on my snowblower? Mine doesn't have anything but a tiny little Lamp #1295 on it and its not bright at all. I have a small 18W LED work light that I tried to hook up directly to the wires instead of the 1295 but its very dim too. Would having a bridge rectifier on it help or what do you think my options are?
Mines on older YardWorks 8.5HPTecu/27" 31AE6GKG515...
 
#1,397 ·
How can I tell how big/type of an LED I can put on my snowblower? Mine doesn't have anything but a tiny little Lamp #1295 on it and its not bright at all. I have a small 18W LED work light that I tried to hook up directly to the wires instead of the 1295 but its very dim too. Would having a bridge rectifier on it help or what do you think my options are?
Mines on older YardWorks 8.5HPTecu/27" 31AE6GKG515...
 
#1,402 ·
What make/model on your blower?
Either me or Andy will be able to help out if you can provide that.

My Honda HS828 pumps out 50 watts, so I have 2 18W LEDs on mine, but in order to run the LED, you gotta turn off the original light. So on my dad's blower I have three switches wired in, one to use original light, one to turn on LED (but kills the original light), and then the third one only turns on the second LED if the first light is on.

For my Honda, just have two switches since it didn't have a light, but did have the stator.

Welcome to the forums, hope we can get you situated.

-Jim
 
#1,407 · (Edited)
Hey guys,

Any help wiring the Toro Powermax HD?
(in my case the 1428, model 38843 with 420cc engine)

Specifically:

A. What is the surplus electrical output of the stator (so I can get correct power LED light)?​
B. What wiring and components are known to function with this platform?​
But really, any insight into wiring LEDs into recent Toro's would be greatly appreciated.

Thanks in advance.

PS: tried searching this thread and the net, but no luck.

PSS: Toro part number for stator is 121-4108. This engine is apparently made by Loncin (China) and their part number is 270210023-T111

Toro link:

Loncin link:
 
#1,408 ·
Hello everyone happy New Year’s. I bought all the supplies needed and have read up on common snow blowers but haven’t seen anything about EFI’s. I started the attempt on wiring but was puzzled by some extra wires. My snowblower is an Ariens 24” SHO platinum EFI. Any help with schematics?
 
#1,409 ·
Got any pictures of your setup and the wires that are confusing you?

I'll try to take some time to look up the wiring diagrams if you can get some pictures.


Hey guys,

Any help wiring the Toro Powermax HD?
(in my case the 1428, model 38843 with 420cc engine)

Specifically:

A. What is the surplus electrical output of the stator (so I can get correct power LED light)?​
B. What wiring and components are known to function with this platform?​
But really, any insight into wiring LEDs into recent Toro's would be greatly appreciated.

Thanks in advance.

PS: tried searching this thread and the net, but no luck.

PSS: Toro part number for stator is 121-4108. This engine is apparently made by Loncin (China) and their part number is 270210023-T111

Toro link:

Loncin link:
Does your Toro already have a halogen light? I'll also try to dig around to see if I can find anything for your machine.
 
#1,422 · (Edited)
Hey everyone,

First time posting.

I am looking to add some LED lights to my MTD Yard Machine snow blower.

I have put together a list of things from amazon that I would like to use to install them:


  • I chose the wiring harness because it came with a waterproof connector, switch and enough wire to complete the job.
  • I chose the LED lights for their low profile and wattage.
  • I chose this because it fit within the voltage range I want to work in and it is already contained in a waterproof housing.

Here's a wiring diagram that I put together, I show the relay in the diagram but I am not 100% sure that I am going to use it:

Image


I'm mainly concerned about the AC/DC converter but I am wondering if anybody out there has any input!
 
#1,456 ·
I finished the installation a few weeks ago but I've been waiting for a good storm to give them a try.

Installation went great and all of the components seem to be working as intended. The plastic where I installed the switch was too thick to use the built in retaining clip so I used a little bit of clear silicone to keep it tight in place.

 
#1,457 ·
I finished the installation a few weeks ago but I've been waiting for a good storm to give them a try.

Installation went great and all of the components seem to be working as intended. The plastic where I installed the switch was too thick to use the built in retaining clip so I used a little bit of clear silicone to keep it tight in place.

View attachment 175623 View attachment 175624 View attachment 175625 View attachment 175626
That looks awesome!!
Well done, and as long as you are happy that is what matters! Do you happen to have a picture of your wiring setup?

Looks like you have enough light with your LEDs to get flashed by a passing car hahaha

Again, great job and thanks for sharing the pictures!
 
#1,424 ·
Did mine 4 years ago. Checked my stator’s output, made sure I was under it and ended up using two 9 watt LEDs (my factory halogen bulb is a 20 watt so I knew I would be safe). Changed the factory switch to a double throw so know I can use the factory halogen or the LEDs. Of course I used a bridge rectifier and two capacitors to prevent any flickering. Everything is tucked up under the dash and LEDs are mounted on the corners of the bars. Has worked out great.
 

Attachments

#1,427 ·
Had some spare time this weekend, set up a few of these for future use. The hobby boxes I usually use are big enough for caps and the rectifier but since the new LEDs require a step down convertor I had to squeeze it in there as well, its a tight fit to say the least :).

View attachment 173549
How much you want for one of those?
 
#1,431 ·
This thread has been both informative and challenging (I am a complete newbie when it comes to ac/dc wiring).

I have a Honda HS928 and have attempted to replace the existing halogen light with an LED bar (ripcord pull start (stator?):
Light Bar 72W
AC/DC TO DC Converter AC 16-28V/DC 16-40V Step Down to 12V/5A
Light Bar Rocker Switch 5Pin

I do not have a diagram, but I am feeling good that I wired it correctly (AC to ground and Smakn, DC +/- to switch and then to lights etc). Is it the fact that the light is 72W and too much for a snowblower (should it be more like 15w?)?

I am still compiling videos/pictures but I am hoping I just fudged the light bar at 72W? Any help is appreciated. The blower starts up with the wiring as configured.
 
#1,432 ·
I'm not an expert on this, but it seems like you have a 60w maximum output on your converter and your LED bar is a 72w light. LED's require a minimum supply to produce any light at all so your light may not even light up at all.

Even if your snow blower can output the 72W required, it looks like the converter will limit it to 60w.

Once again, I am not an expert haha. Just something I noticed that might cause you issues.

These are the lights I used for my project which uses a similar converter to yours:

 
#1,439 ·
With the temps in the single digits this weekend, I decided to take on adding two 18W LED Lights to my Ariens. And just in time for tomorrow's nor'easter expecting to dump 12-18" here in S NH. This was my first time soldering so I had a bunch of retries. And some redos after forgetting to put on the heat shrink first! So I don't overload the stator, I ended up adding a switch for each LED so I could turn on one LED while having the hand warmers on. Or two LEDs on with the hand warmers off. Each LED is attached with waterproof plugs in case I need to swap one out. I also added a plug to the halogen light in case I ever want to switch back. I added a project box containing the rectifier and the capacitors to keep them dry with lots of hot glue to keep things in place.

Thank you to all that have offered advice! I read them all and some several times!
 

Attachments

#1,448 ·
Got my snowblower set up finally with a bridge rectifier and I am getting about 24 v DC and still about 1 v AC. I tried out the light last night in the storm and worked great for the 30 minutes or so of work. Went out this morning to clean up from the plow and light worked for about 5 minutes and went out. I still have 24 v DC going to the light, but the light won't turn on. When I connect the light to 12v car battery it turns on. Then I reconnect it to the snowblower it works for 5 to 10 minutes and goes out again. I am just not sure what I could do to fix this. I have never had any flickering on the light and my snowblower doesn't have an idle so its full all the time. The only thing I don't have in my set up is a capacitor, but I assumed I didn't need one since my power is always constant at 24 v and I had not flickering. I run from the machine to the rectifier to a switch then to the light. There is a fuse between the machine and the rectifier as well. Any ideas are welcome.

Below is the light I used.
light
 
#1,451 ·
Just wanted to follow up to say I got this light in the mail yesterday and it is awesome, really bright! https://www.amazon.com/gp/product/B06X3WLVKJ

Charges up by USB-A or micro-USB and the magnets on the bottom stick right to the bucket. I can take it in the house to charge easily before a storm so it is ready to go. A great alternative for anyone who does not have a stator wire.
 
#1,459 · (Edited)
First post.... Wow, this is a whole lot of useful information. Thanks! I have some ... questions?

I have a ~2013 Toro PowerMax HD926 OXE (Ser# 313xxxxxxx), which came with a light kit which consists of the stator 121-0362, a wiring harness 120-3062, a mounting bracket and bulb reflector, and a halogen bulb type 899 (37.5W).
176147
176148


176149


My original thought was to get the matching male connector to the female bulb connector (and I found a source), so I could just unplug the existing bulb and plug it into whatever I create, which is nondestructive. However, the Toro wiring harness is reasonably cheap (nearly as expensive as the connectors I'd need to buy), so I was thinking I'd just either hack up the existing harness or replace it and hang on to it in case I need to un-do.

Am now thinking it'd maybe be easiest to get a premade wiring harness (or similar to that link) which uses a switch, a relay, a couple of fuses, and more wire length than I need. I'd need to add a 12V AC-DC converter, something like this 3A one (that's been posted about here before), or this 5A one which is IP67 rated, and wire the output of the AC-DC converter to the harness...

176155


Questions:
  1. The stator has four wound posts (see the pic at the link above), but I can't find any information on how much output it has (but it's clearly at least 37.5W). Does anyone know what the output of this stator is? Alternately, can someone tell me (precisely!) how to measure with a Fluke 79 Series II? Can I just go inline between the stator and the bulb?
    Edit: The same stator part number is used on a 928 OHXE, so I suspect the output is more like 60W, but don't know. Help?
  2. Does anyone know the part number of the white locking connectors (the output of the stator)?
  3. I think it ends up being cheaper to buy the harness, even if I don't really need the relay. Thoughts?
  4. Anything else I should know?
  5. Am I an idiot? (I'm not an EE, though I wish I knew more about EE)
Thanks!!!